How to Write a Cheque in CanadaCheques are the most common and popular means of making payments. However, many people have resorted to modern and technologically advanced forms of payment like online transfers and the use of debit and credit cards. It is still useful to know how to write a cheque in Canada so that it comes in handy in situations where you need to make a payment by cheque. Writing cheques is a very easy-flowing process, and you can write your cheques in any order that you wish. You need to make sure that you don’t miss any important information that’s vital for cheque processing. It is possible that you might not have written a cheque for quite some time, or it is your first time doing so. In this case, you are bound to have many queries about how to write a cheque at TD Bank (Toronto Dominion). 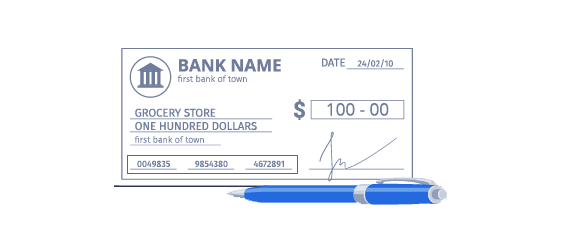 Using the correct method to write a cheque can save you from lots of fraud and facilitate faster processing by banks. If any element of your cheque is missing or if anything is wrongly written, your cheque can be rejected by the bank, and your payment will be stopped. Keep reading ahead to know how to write the cheque with cents, what precautions should be taken while writing a cheque, and other related things.
Steps to Write A Cheque In CanadaThere are a lot of fields to be filled in while writing a cheque. You should be aware of how to write a cheque Scotiabank (Bank of Nova Scotia) to fill in the correct details in the right places. Cheque DateThe date is supposed to be written in the top right-hand corner of the cheque. It represents the day when you have written the cheque and the day when it can be cashed. You can also use cheques after the due date has been crossed for up to 6 months. If you do not have the required funds in your account but need to give a cheque to somebody, you have the option to post-date the cheque accordingly. A post-dated cheque cannot be cashed earlier, as per the Canadian Payments Association’s cheque clearing rules. Some cheques have a faded watermark on the date field to inform you of the acceptable date format. Mostly, it will be YYYY-MM-DD. If the watermarks are not there, you can still use this format or contact your bank to ask them about the acceptable form. PayeeYou need to write the payee’s name on the “pay to the order of” line. This field is the most important one, and you need to take care that only the right name with the correct spelling is written in this field. The name could be of an individual, a company, a school, a charitable trust, or any organization that has a bank account. Do not use any acronyms or abbreviations unless the person or organization officially uses them in their names. You can write the words “cash,” “bearer,” or “myself” on this line for withdrawing money for yourself. However, it is not recommended to mention “cash” and “bearer” as it can lead to fraud if the cheque is stolen. Amount in Numeric FormMany people do not know how to write a cheque in cents. If your cheque amount is 120 dollars and 50 cents, you will need to write it as “120.50”. The dollar sign is already printed on the cheque. You simply need to start writing your cheque amount using numbers in the dollar amount box. It is good to start writing these numbers from the extreme left of the box, which does not leave any space for more numbers to be added by anyone. Make sure to use two decimals for writing the cents amount. In the above example, it is $120.50 – you should never write it as $120.5. Amount in WordsThe next step is to write the same amount in words below the payee name in the respective field. This field is not legally required to be filled in, but it is highly recommended that you write your cheque amount in words as well. If the amount in numeric form does not match the amount written in words, the teller will cash the cheque with the amount written in words. If you know how to write a cheque RBC (Royal Bank of Canada), you can easily fill in this field. For an amount of $540.26 – you will write it as “Five hundred and forty dollars and 26 cents,” or “Five hundred and forty dollars and 26/100”. Alternatively, you can also write the amount as “Five hundred and forty and 26/100 dollars”. The cents amount is either written as a fraction or written in numbers with the word “cents” followed by it. SignatureThe bottom right corner of the cheque has a signature line to be signed on. You should only use a legible signature that is recorded with your bank. This signature makes the cheque valid and tells the bank that you agree to pay the stated amount to the payee mentioned. Always sign the cheque after filling in all the details and double-checking the same. If your cheque does not bear a signature, it will be rejected. Make sure to include your signature only at the right place and not anywhere else, as signatures are also used to correct errors and replace names and amounts on cheques. MemoThe memo section allows you to include a short description or a note stating the reason for that particular cheque payment. For example – “January rent payment” or “Painting bill”. It lets you remember the reason for which you wrote the cheque. Moreover, it also becomes convenient for your accountant to know the reason behind every payment and to be able to treat the transaction accordingly. The memo line enables both parties to keep a record of their payment and receipt particulars and avoid confusion and misunderstandings. The other elements of a cheque include the cheque writer’s name and address, which are already pre-printed on every cheque. You can also add your phone number and email address by contacting your bank. There is another important element on cheques known as the MICR line. It consists of your cheque number, account number, transit number, and your banking institution code. Cheque numbers are different for every cheque, whereas all the other numbers remain the same on every cheque that you write, print, and mail. The transit number represents your home branch and the institution code represents your bank, irrespective of the branch that you are using. Using A Cheque RegisterTypically, you get a cheque register attached to the front or back of your chequebook. This cheque register contains some blank columns for you to fill in each time you write a cheque. It helps you keep a record of all the cheques you wrote and reminds you about their particulars. If you didn’t get a cheque register along with your chequebook, there are probably stubs or payslips attached to each cheque that remain as it is, even after your cheques are torn out. You can simply fill in the cheque details in these payslips and store them for future reference. In cases where you didn’t receive any cheque register or attached payslips, make sure to purchase a register or maintain your cheque details in a spreadsheet. Either way, it is vital that you maintain the records whenever you write a cheque. You should enter all the required information like the cheque date, number, description, and payee name in the cheque register. A cheque register can be useful to you in the following ways:

Security Measures and Tips on How to Write a Cheque In CanadaOnce you know how to write a cheque to Scotiabank (Bank of Nova Scotia), you can secure it from any potential fraud using general tips and preventive measures. Some very common yet useful tips to be considered while writing a cheque are:
Your cheques should be used exactly how you intended them to be used, and the right amount of payment should be made to the right person. If you take some additional security measures along with the above general ones, it is possible to keep your cheques secured from fraud. In short, by following these things, you are making it difficult for the thieves to forge or alter your cheques if they are lost or stolen.
Alternative Payment OptionsIf you are still not sure about using cheques or are confused about how to write a cheque BMO (Bank of Montreal), there are always other modes of payment available. Furthermore, you can use cheques as well as other payment options. Electronic payments are simple to use as everything gets stored automatically, and these records are accessible to you at any time. There are no physical things involved that can be stolen and altered for fraudulent purposes. These transactions are very easy to track and already exist in a searchable and downloadable database consisting of all the necessary details.
You need to take care while using any payment method as fraudsters can find their way to conduct any kind of fraud – whether online or offline. There are many kinds of risks involved in using online payment methods also. Hence, you need to take some basic precautions while using cheques as well as electronic means of payment. If you know how to write a cheque at CIBC Bank (Canadian Imperial Bank of Commerce), you can easily follow the general guidelines and save yourself from fraud. What Should You Do If You Make a Mistake While Writing a Cheque?Sometimes, it happens that you mistakenly write the wrong payee name or amount. Your check might either get rejected due to wrong details that do not make sense, or your payment will be transferred to whoever’s name is mentioned on the cheque. Hence, you need to be aware of these things and take extra care while writing cheques. If you know how to write a cheque in Canada, you would know how to void a cheque. Voiding the cheque means to state that a cheque is invalid so that no one uses it. This step is essential in discarding cheques. For correctable mistakes, you can cross out the error with a horizontal line and rewrite it correctly. You are needed to insert your signature next to these corrections to send a message to the bank that you approve them. If the errors are uncorrectable, you should discard the cheque and use a fresh one. Write VOID in capital letters across the cheque, covering all the fields of the cheque. Make sure to not write it over the MICR line. For added security, destroy the cheque after marking it void. Voided cheques might be asked for by some landlords, insurance companies, or employers, in order to verify your bank details. How To Cash or Deposit a Cheque?To cash a cheque means to get access to the cheque amount by depositing it in your bank account. Either you are paid in cash, or the amount is simply transferred to your bank account; it depends on what is written on the “pay to the order of” line. For depositing a cheque, its date and the date you are depositing it on should be the same. Otherwise, you can deposit the cheque after the due date has passed. The cheque’s due date must have arrived. Banks do not process post-dated cheques; in fact, your cheque might get bounced if someone deposits your post-dated cheque and you don’t have that many funds in your account. An NSF (non-sufficient funds) fee is also charged by the bank when your cheque gets bounced. Please keep in mind that cheques are valid for a period of 6 months only from the date mentioned on them. After that, your cheques will be considered “stale-dated” and might be titled as “invalid” by your bank. The easiest way to cash a cheque is to take it to any bank branch with which you have an account. The teller is likely to ask you to swipe your debit card and enter your PIN to confirm your identity. You can also deposit cheques using an ATM (Automated Teller Machine) – you will have to insert your debit card and enter the PIN, after which the ATM will guide you through the further steps. These steps differ for every ATM. Once the cheque is cleared, and your bank has received the money, the funds will be credited to the payee’s account. Write, print, and mail cheques without stocking any inventory, worrying about the format and standing in a queue at the post office – PostGrid‘s print and mail automation platform can get it all done. 
The post How to Write a Cheque (Canada) appeared first on PostGrid. Via https://www.postgrid.ca/how-to-write-a-cheque-canada/
0 Comments
Leave a Reply. |
About UsPostGrid Canada provides automation software and REST API Solution for direct mail & print and address verification ArchivesNo Archives Categories |

 Also Read:
  RSS Feed
